Monday, August 17, 2020


Wednesday, August 5, 2020
How to enable e-mail as a two-factor authentication for a user and increase token timeout on FortiGate
I would say absolutely that FortiToken (be it a mobile app or a physical
token) is the most secure and preferable way today for multi-factor
authentication. The other two - SMS message and e-mail message are vulnerable
to many attacks, including not so technically sophisticated SMS swapping. But
sometimes a less secure method is better than none. Two catches with using an
e-mail as MFA on Fortigate though:
- It is not available in the GUI until you turn it on at the CLI.

- e-mails tend to get delayed sometimes, and the default validity time for any Fortigate produced token code (SMS, e-mail, FortiToken) is 60 seconds. If the user doesn't enter the token code within 60 seconds of issuing - code becomes invalid. It is usually not a problem, but recently I had to enable e-mail MFA for our branch location with substantial e-mail delays being a norm. So optionally below you can find how to increase the default timeout.
- Enable e-mail option as MFA
for a user:
config user local
edit "karthi"
set type password
set two-factor email
set email-to "karthi@abc.com"
next
end
Now the option for e-mail as 2-factor authentication appears in GUI:

(Optional) Increase
token code validity from 1 to 2 minutes:
config system
global
(global) #
set two-factor-email-expiry ?
two-factor-email-expiry Enter an integer value from <30> to <300> (default =
<60>).
(global) #
set two-factor-email-expiry 120
Thanks for reading my blog.
Thursday, December 13, 2018
How to Disable HTTP Method OPTIONS for the web applications in IIS 7.5 and above
ABOUT OPTIONS METHOD
OPTIONS is a diagnostic method which is mainly used for
debugging purpose. This HTTP method basically reports which HTTP Methods that
are allowed on the web server. In reality, this is rarely used for legitimate
purposes, but it does grant a potential attacker a little bit of help and it
can be considered a shortcut to find another hole.
How to fix it
OPTIONS method should be disabled.
Way to do it
Methods to disable OPTION method may vary depending upon the
type, version of the web server.
- Open IIS Manager.
- Select the name of the machine to configure this globally (or change to the specific web site for which you need to configure this).
- Double click on "Request Filtering".
- Change to the HTTP Verbs tab.
- From the Actions pane, select "Deny Verb".
- Insert 'OPTIONS' in the Verb, and press OK to save changes.

Regards
R.Karthikeyan
Tuesday, July 3, 2018
list of Windows PowerShell commands Useful for administrators
Add a DLL to the GAC
1. Run the Power Shell console as Administrator.
2. Enter the following PowerShell
Set-location "c:\Folder Path"
[System.Reflection.Assembly]::Load("System.EnterpriseServices, Version=4.0.0.0, Culture=neutral, PublicKeyToken=b03f5f7f11d50a3a")
$publish = New-Object System.EnterpriseServices.Internal.Publish
$publish.GacInstall("c:\Folder Path\DLL.dll")
iisreset
Remove a DLL from the GAC
1. Run the PowerShell console as Administrator.
2. Enter the following Power Shell
2. Enter the following Power Shell
Set-location "c:\Folder Path"
[System.Reflection.Assembly]::Load("System.EnterpriseServices, Version=4.0.0.0, Culture=neutral, PublicKeyToken=b03f5f7f11d50a3a")
$publish = New-Object System.EnterpriseServices.Internal.Publish
$publish.GacRemove("c:\Folder Path\DLL.dll")
iisreset
Regards
R Karthikeyan
Monday, March 26, 2018
Tuesday, October 10, 2017
MCSA 2016 Prepartion and practice Exam
This practice test consists of 15 questions, with correct answers and comments following each submission. They prefer to provide answers and comments after every question so you can see where you’re going wrong and to learn from your mistakes. There’s no point getting to the end of an exam only to realist that 10 out of 20 questions were wrong but with no idea which ones they were.
The test is free and you can retake it as often as you like: on desktop, tablet or mobile. The questions were handwritten and I do not approve of PDF braindumps - you won’t find any copied material here.
Braindumps - It’s worth asking yourself if you’re ok with braindumps. These barely legal documents essentially equate to cheating your way through life. Where’s the self satisfaction or even the challenge in cheating? You’ll get greater pleasure and reward for actually learning the material and passing the exam legitimately. Stick to official training material and do yourself justice in passing the exam yourself - you know you can!
Practice Exam Free
http://www.accelerated-ideas.com/exams/practice-exam.aspx?group=70-740&fq=1&qmax=30
Reference Book:
MCSA 70-740 : http://amzn.to/2g8bhR8
MCSA 70-741 : http://amzn.to/2wKkYbw
MCSA 70-742 : http://amzn.to/2g8CTpi
Regards
R.Karthikeyan
The test is free and you can retake it as often as you like: on desktop, tablet or mobile. The questions were handwritten and I do not approve of PDF braindumps - you won’t find any copied material here.
Braindumps - It’s worth asking yourself if you’re ok with braindumps. These barely legal documents essentially equate to cheating your way through life. Where’s the self satisfaction or even the challenge in cheating? You’ll get greater pleasure and reward for actually learning the material and passing the exam legitimately. Stick to official training material and do yourself justice in passing the exam yourself - you know you can!
Practice Exam Free
http://www.accelerated-ideas.com/exams/practice-exam.aspx?group=70-740&fq=1&qmax=30
Reference Book:
MCSA 70-740 : http://amzn.to/2g8bhR8
MCSA 70-741 : http://amzn.to/2wKkYbw
MCSA 70-742 : http://amzn.to/2g8CTpi
Regards
R.Karthikeyan
Thursday, October 5, 2017
Microsoft Certification Path
Hi Friends,
Please find the attached certification path for Microsoft(MCSA & MCSE).

Friday, September 22, 2017
Adding NANO Server to Domain controller 2016
Adding NANO Server to Domain controller
After Creating Success Full Nano Server. We need to do some initial configuration to communicate from Domain controller.
- We need set IP Address
- We need to enable ALL file share and printer sharing session from the inbound firewall rule
Once finished above task. We can move to Domain controller and follow the steps for join nano server to domain.

You will receive file on c:odjblob and you need move same file into your Nano server.
From DC in the file explorer
2. Need to add Nano Server as trusted host on DC

3. You can view the trusted hosts from the below Command
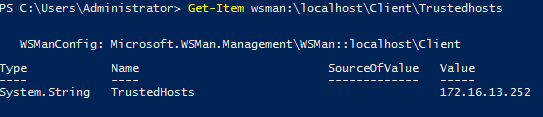
4. You can add Nano server to domain through following command (Offline)

5. To confirm domain join we have to restart the Nano server.

6. We can login through you domain administrator credential.
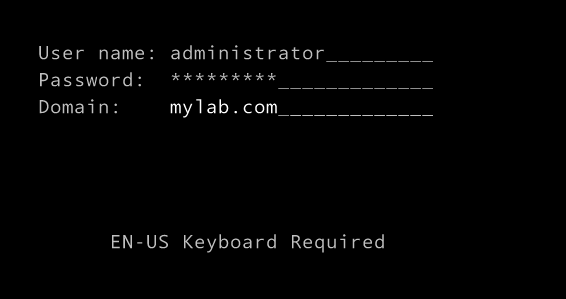
7. You can see the Domain Column it’s showing my Domain name MYLAB.COM
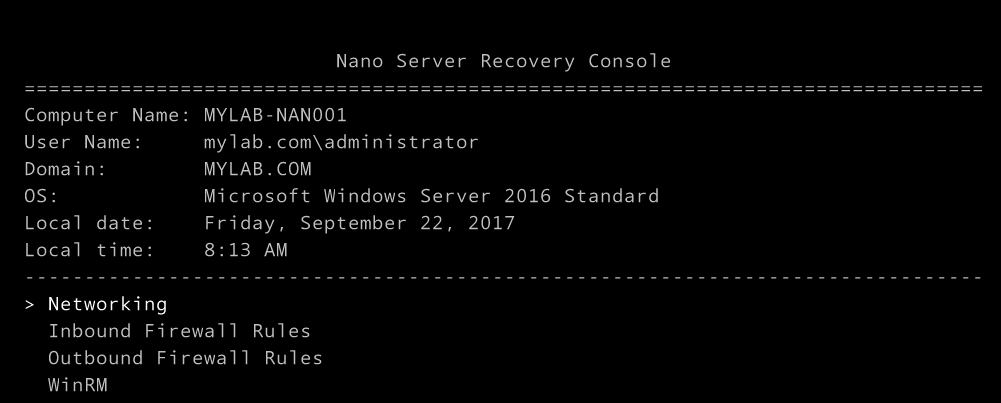
I just create one html file and pasted into Nano server IIS root folder to confirm my Nano IIS server is working fine. Here we go…..

Regards
R.Karthikeyan
Monday, September 11, 2017
Direct download .bak files through IIS Windows 2012 R2
Hi,
Some time for some reason we avoid using FTP Server and we wold like to have alternate for dwolading huge size files.
In My Case almost 20 GB file i need to transfer from one location to another location.
I can use FTP but some of speed restriction policy applied in my FTP server during the peak hours.
we do have alternate ISP in this we are not configure any FTP.
In this i just used IIS Server.(note: Source server I am having public IP access).
I just Followed these three steps and Stared Donwload.
1. Host the test Application.
2. Enable Directory Browsing Give Permisiion to IIS_IUser and IUSR
3. Adding MIME Type.

Add additional MIME types for PKGs:
a. Select Default Web Site in the left sidebar.
b. Double-click MIME Types.
c. Click Add from the right sidebar and type ".bak" in the File name extension field and "application/octet-stream" in the MIME type field. Then, click OK.
Not everything has a custom mime type. For generic binary files


Friday, May 19, 2017
Moving Temp DB to Different Folder / Location
---Determine the logical file names of the tempdb database and their current location on the disk.
SELECT name, physical_name AS CurrentLocation
FROM sys.master_files
WHERE database_id = DB_ID(N'tempdb');
GO
----Change the location of each file by using ALTER DATABASE.
USE master;
GO
ALTER DATABASE tempdb
MODIFY FILE (NAME = tempdev, FILENAME = 'F:\TEMPDB\tempdb.mdf');
GO
ALTER DATABASE tempdb
MODIFY FILE (NAME = templog, FILENAME = 'F:\TEMPLOG\templog.ldf');
GO
--Stop and restart the instance of SQL Server.
--Verify the file change.
SELECT name, physical_name AS CurrentLocation, state_desc
FROM sys.master_files
WHERE database_id = DB_ID(N'tempdb');
--Delete the tempdb.mdf and templog.ldf files from the original location.
Thursday, May 11, 2017
How to identify what features has been installed in your SQL Server
How to view the list of features installed in the SQL Server easily without going through “Programs and Features” or “Services”.
Yes, there is an easy way.
Method 1:
we can navigate to the Following Path and see the summary file.
SQL server 2012 Features Installation Discovery.
C:\Program Files\Microsoft SQL Server\110\Setup Bootstrap\Log\Summary.txt


Yes, there is an easy way.
Method 1:
we can navigate to the Following Path and see the summary file.
SQL server 2012 Features Installation Discovery.
C:\Program Files\Microsoft SQL Server\110\Setup Bootstrap\Log\Summary.txt
SQL Server 2008 Features Installation Discovery.
C:\Program Files\Microsoft SQL Server\100\Setup Bootstrap\Log\Summary.txt


Method 2:
Second method is you can go to the Startup and choose the SQL Server Installation Center.

Select Tools on the Left side and choose Installed SQL Server Features Discovery Report

you will get the Report in internet explorer.

Regards
R.Karthikeyan
Tuesday, May 2, 2017
Ports for windows file sharing
Sharing a folder or file creates a Windows Firewall exception for File and Printer Sharing. The exception opens the ports listed in the following table.
"If the server has NBT enabled, it listens on UDP ports 137, 138, and on TCP ports 139, 445. If it has NBT disabled, it listens on TCP port 445 only."
| Connection | Ports |
|---|---|
TCP
|
139, 445
|
UDP
|
137, 138
|
The default scope is to allow access from any computer on the network, including computers on the Internet. Unless you block incoming connections on these ports using a hardware firewall, firewall server, or other Internet-sharing device, your computer will be vulnerable to attack from the Internet as long as your Internet connection is active.
Regards
கார்த்திகேயன்
Karthikeyan
Regards
கார்த்திகேயன்
Karthikeyan
Thursday, August 25, 2016
useful commands-Fortinet Firewall-Part 2
Viewing
and clearing a DHCP lease is a function you may need to often
perform.
The DHCP option is located in different areas of the GUI
depending on the firmware version you are running.
The
below commands allows you to view and clear a DHCP lease through the CLI.
Commands
exec dhcp lease-list –> show current list on DHCP lease
execute dhcp lease-clear <ip_addres> –> clear the DHCP lease of a specific ip
execute dhcp lease-clear all —> clear all the DHCP leases
execute dhcp lease-clear <ip_addres> –> clear the DHCP lease of a specific ip
execute dhcp lease-clear all —> clear all the DHCP leases
Regards
R.Karthikeyan
Thursday, July 14, 2016
The database principal owns a schema in the database, and cannot be dropped
Last day I had faced issue on SQL Server Login. I was
trying to remove the login from database but every single time I was getting
error and was not able to remove the user.
How to resolve following error.
The database principal owns a schema in
the database, and cannot be dropped. (Microsoft SQL Server, Error: 15138)
I was searching on google and find the solution. Here
is the quick workaround to the issue. The reason for error is quite clear from
the error message as there were schema associated with the user and that needs
to be transferred to another user.
Workaround / Resolution / Fix:
Let us assume that i was trying to delete user
which is named as ‘tester’ and it exists in the database ‘Testdb’.
Now run following script with the context of the
database where user belongs.
USE Testdb;
SELECT s.name
SELECT s.name
FROM sys.schemas s
WHERE s.principal_id = USER_ID('tester');
In my query I get following two schema as a result.
two schema name "tqd" and "cls"
Now let us run following query where I will take my
schema and and alter authorization on schema. In our case we have two schema so
we will execute it two times.
ALTER AUTHORIZATION ON SCHEMA::cls TO dbo;
ALTER AUTHORIZATION ON SCHEMA::tqd TO dbo;
Now if you drop the database owner it will not
throw any error.
Here is generic script for resolving the error:
SELECT s.name
FROM sys.schemas s
WHERE s.principal_id = USER_ID('youruserid');
Now replace the result name in following script:
ALTER AUTHORIZATION ON SCHEMA::YourSchemaNa TO dbo;
Thanks to pinal dave for such a good article.
Regards
R.Karthikeyan
Friday, July 8, 2016
Fortigate Firmware upgrade Process On HA
Recommend before the upgrade:
1) Check the release notes for supported upgrade path, special notices, product integration, known issues and limitations if any.
2) Backup configuration before and after each upgrade.
3) Plan a maintenance window for the upgrade.
3) Have some one available on the remote site in case something went wrong during the upgrade.
4) Make sure check sum is matching between cluster members using the following CLI commands:
# get sys ha status
# diag sys ha showcsum
# execute ha manage <Slave ID> <<-- could be 0 or 1, check "get sys ha status" results
$ diag sys ha showcsum
$ exit
The results of "diag sys ha showcsum" should be the same on all levels (all/global/vdoms)
1) Check the release notes for supported upgrade path, special notices, product integration, known issues and limitations if any.
2) Backup configuration before and after each upgrade.
3) Plan a maintenance window for the upgrade.
3) Have some one available on the remote site in case something went wrong during the upgrade.
4) Make sure check sum is matching between cluster members using the following CLI commands:
# get sys ha status
# diag sys ha showcsum
# execute ha manage <Slave ID> <<-- could be 0 or 1, check "get sys ha status" results
$ diag sys ha showcsum
$ exit
The results of "diag sys ha showcsum" should be the same on all levels (all/global/vdoms)
Thursday, July 7, 2016
Windows Time Service Issue
I just wanted to make a statement regarding the time service registry entries. There really is no need to modify the time service registry entries. The time service works by default, out of the box. The only thing that’s recommended to do, is synchronize the PDC Emulator in the forest root domain to a reliable outside source. That’s it.
I’m stating this because based on numerous public postings regarding corrupted time service settings due to attempts at changing registry entries because it was thought that’s how it’s done, is usually the culprit that corrupted the time service settings. The time service should only be configured using the w32tm utility.
If there are any problems with corrupted settings, and it’s not working properly, I would suggest to simply reset the time service itself (stated in the “To Reset the Time service” section below), by simply running the following commands:
If you’ve experimented changing time settings to unknowlingly avert default behavior, you can set the time settings back to default:
1. On the DC that you’re experiencing issues with, run the following in a command prompt:
- net stop w32time
- w32tm /unregister
- w32tm /register
- net start w32time
2. On the Server in question (whether it’s the PDC Emulator or another server), run the following in a command prompt:
- “net time /setsntp: ” (Note the blank space prior to the end “) [This tells the client (whether a DC or workstation) to delete the current registry settings for time and use default settings.]
- Restart the time service: Net stop w32time && net start w32time
3. On the PDC Emulator run the following in a command prompt:
- W32tm /config /manualpeerlist:time.nrc.ca /syncfromflags:manual /reliable:yes /update
- W32tm /resync /rediscover
- Restart the time service: net stop w32time && net start w32time
4. On each DC that are not holding the PDC Emulator role, run the following in a command prompt:
- w32tm /config /syncfromflags:domhier /update
- W32tm /resync /rediscover
- Restart the time service: net stop w32time && net start w32time
5. This will take out any errors in the Event Viewer, if there are any.
.The only real time that you may have to configure it is only with the assistance of Microsoft Support.
Tuesday, June 28, 2016
Boot from ISO image failed on Generation 2 VM in Hyper V
Generation 2 virtual machines in Hyper-V talks booting from CD/DVD. It’s
not specific to Hyper-V, it’s more about PCAT and EFI, and the way in which
Windows installation media is built.
Try the following – create a new generation 1 and generation 2 VMs with
blank VHDXs, setting them both to boot from Windows 8 64-bit .ISO media, and
start them.
Here’s what you’ll see in a generation 1 virtual machine (or PCAT
physical system)

And here’s what you’ll see in a generation 2 virtual machine (or EFI
physical system)

Before anyone comments, yes, Microsoft acutely aware that the generation
2 EFI boot loader messages persist on the screen and it can be a little
confusing. Essentially what the generation 2 virtual machine did was:
- Attempt
to boot from the CD SCSI device containing the Windows 8 ISO. This is
where the ‘Press any key…’ message came from. As no key was pressed, we
went to the next boot entry. (And this is where we didn’t clear the
message from the EFI CD boot loader)
- I
didn’t press F12 (in fact, this VM wasn’t connected to a network), so
network boot failed
- The
SCSI VHDX is raw with no partitioning or file system, so this too failed
So why did the generation 1 virtual machine start setup from the Windows
media? The answer is simply that it’s the way Windows media is built, and it’s
inconsistent between the PCAT and EFI loaders.
However, it’s relatively simple to solve if you want to avoid the press
any key message. In fact, we almost have all the pieces from previous parts. In
particular, part 4 where we injected keyboard drivers into the Windows 8 media.
If you loopback mount Windows 8 or 8.1 RTM media, and navigate to the
\efi\microsoft\boot directory, you will see there are two versions of
cdboot.efi

The default version, cdboot.efi prompts for a keypress. The unused
version, cdboot_noprompt.efi doesn’t prompt.
So it’s fairly simple to create modified media which uses the noprompt
version. First, copy the contents of the ISO to a working directory, rename
cdboot.efi to cdboot_prompt.efi, and rename cdboot_noprompt.efi to cdboot.efi.

Do the same with efisys.bin and efisys_prompt.bin

Then re-use our oscdimg command (in an elevated deployment and imaging
tools environment) from part 4 to recreate the media.
you can download oscdimg from below Link
https://drive.google.com/open?id=0Bz5RYxg0eeodbUxQRW1kVndSTzgor
http://api.256file.com/download/87465_oscdimg.exe

if you receive ERROR: With -u2, cannot use -n, -nt, -d, -j1, -j2, or -oi
just skip -n
d:\Software>oscdimg -o -u2 -udfver102 -bootdata:2#p0,e,b"D:\Software\win2012nop
rompt\boot\etfsboot.com"#pEF,e,b"D:\Software\win2012noprompt\efi\microsoft\boot\
efisys.bin" "D:\Software\win2012noprompt" C:\Working\WIN2012noprompt.iso
Simply attach this modified media to the generation 2 VM and restart it
(and don’t press any keys, not that you will be prompted.
Regards
R.Karthikeyan
Subscribe to:
Posts (Atom)